Friday, December 10, 2010

Happy Holidays to all…

Hi Everyone!  I have not posted in a long, long time, I know, but I have been pretty busy with work and found myself in a creative slump.  :( 

As I was pondering getting my hands into something, my creative juices started flowing and I remembered I purchased Mary Green’s “Vintage Glue Book” class and decided to try a glue book.  I have not had this much fun in quite a while…and quite a mess too!  Because the holiday season is upon us, I decided to do a Santa book as my first attempt.  I used everything I could get my hands on for this one…scrapbook papers I had been collecting for a while (years), images from the wonderful Graphics Fairy, Green Paper Packages and a wealth of other sites.  I am actually thinking of sending this as a card/gift to someone I love.  Please enjoy the pics! 
CC1

CC2

CC3

CC4

CC5

CC6
CC7

CC8

CC11

CC9

CC5

CC10
I reserved the last page to be inscribed with a message to the recipient.
CC13
The absolute best thing was getting those old creative juices flowing again.  I am going to be busy with work for the next several months starting, so I going to apologize in advance for not posting more frequently.  What have you been up to?  Got any great holiday projects in the making?  I’d love to see it!  Send me your link!
If you have not joined Mary’s class at Green Paper Packages, do so!  It’s a great way to use your scraps.  In addition, her class offerings are growing.  I have just gotten involved with another class “Collage Basics”.  Even if you have done collage before, it’s still of benefit and her images are fabulous!
Saturday, July 24, 2010

Here’s What I’ve Been Up To…

I have been having a fun time taking old hardcover books and making organizers from scraps.  They can be used for just about anything…photos, mail, coupons, recipes etc.  I have been making them for everyone.  They are really fun and go very quickly.  Please enjoy the photos!


Here is a look at one I made as a birthday gift for a friend.  For this one, I covered the inside cover with paper and then hand cut the flowers from another piece of scrapbook paper and glued those down:

Desk Organizer Marge 1

Here is the same book as a close up:

Desk Organizer Marge 2


Here is a photo of one my hubby keeps on his desk.  For this one, I just used paper to cover the inside covers:

Desk Organizer Mister 1

Here is another view, as you can see he is already using it for his coupons for McDonalds:

Desk Organizer Mister 2

Just fold the pages in half and decorate the inside of covers.  The book will always stay open, so there is no need to decorate the outside covers. 

Saturday, July 17, 2010

Meet my BFF…

Well, you may have already met my BFF.  It’s Jean!  Here she is:


My best girlfriend was my mom, Jean.  Here is her picture:

Mimi large

She always wore hoop earrings, black was her favorite color and always had on sunglasses.  She has passed on, and I still miss her all the time…


My other BFF, is Mister.  I know it’s a guy, but Here he is:

 Mister2


Can you see a resemblance?


Mister


Thanks to everyone who played today!  It was really fun!  I will be around to visit your site and have a gander at your girls! (Maybe a few more guys will show too!

Monday, July 12, 2010

Getting Ready for "Got Girlfriends"?

The party is getting ready to start this Saturday...won't you join us?  Here is the link to sign up if you haven't done so already!  I would love to have you there! 


Thursday, July 8, 2010

A New Place for Blog FREEBIES and MORE!

Looking for a new blog or a few FREE blog goodies?  There is a new blog on the block...Make Mine Fabulous!  where you can find complete UNIQUE  blog designs.  These designs are special because they will only be sold to ONE owner such as a custom design would be.  Be sure to check out the FREEBIES while you are there!

Please help support my alter ego and visit there today.  Thanks, everyone!

Just click on the image below to go there:


Monday, July 5, 2010

I am Featured Today! WOW!

WOW! What a day! I am so excited! I am being featured today at the Paper Craftorium! Dawn wrote a flattering article about Queen Bee Studio and I am extremely honored. Please visit the site. There are several past postings on some VERY talented crafting people, not just me, but today is my day. Wahoo!

Here's the button to get you there quicker! Thanks everyone!

I was on the Paper Craftorium

Friday, July 2, 2010

Got "Girlfriends"? - Let's Meet Your BFF

It's time to have a little fun! Here's how to play:
  1. Use the "Girlfriend" Tutorial as your guide. Click here for the tutorial.
  2. Create at least one "Girlfriend". Feel free to invite some friends over and you all create some. It's up to you!
  3. On the day of the Party, post your "Girlfriends" that you created on your blog along with an actual picture of you and your friend(s).
...Sounds like fun, doesn't it?

Here's how to participate:
  1. Add your blog to the Linky Tool list at the end of this post. (I've already added myself as what would a great party be without the hostess?)
  2. Feel free to leave a comment too (we all love comments).
  3. Please help me spread the word by taking my Got "Girlfriends?" button and placing it on your blog, especially if you are participating and even if you are not, I would love to have you help me spread the word. I've made it easy for you to just grab the code from the box below or my sidebar:


Queen Bee Studio


On the day of the party 07/17/10, come to Queen Bee Studio and visit all the participants and be sure to leave them a comment. Got questions? Just send me an email.

Thursday, July 1, 2010

How To: Leave a Link When Leaving Comments

I hope you are all having a great week! I have had some of you ask how I leave my link when leaving comments on your blogs, so I thought I would share it with everyone. It's a simple code that I add at the bottom of my remark and here it is:


<a href=”http://YOURBLOGADDRESS.blogspot.com”>NAME OF YOUR BLOG</a>

So, for example, here is mine:
<a href=”http://queenbeestudio.blogspot.com”>Queen Bee Studio</a>


Want to leave your email address?...here's how to do that:

<a href =”mailto:YOUREMAILADDRESSHERE”>DISPLAY NAME</a>

Here is how mine would look:
<a href=”mailto:queenbeestudio@gmail.com”>Queen Bee</a>


Yes, you can post both codes at once. Have a wonderful day!

Wednesday, June 30, 2010

Tutorial – My “Girlfriends”

Due to an overwhelming response in my studio posting about my “girlfriends”, I thought I would post about how I made them.  All of them were made from scraps and punches.  That’s the best part.  Here is what you will need:

  • 1/2 inch circle punch – inside of sunglasses
  • 1 inch circle punch – sunglass frames and boobies (you can also use a 1 inch flower punch for the boobies)
  • 1 and 7/8 inch to 2 inch circle punch - head
  • Extra large scallop punch - body
  • Small heart and or circle hole punch for the mouth
  • Various small punches (about 1/2 inch) in shapes such as snowflakes, flowers, etc. – for the hair
  • Flesh colored card stock for the bodies – black for glasses – various other colors as desired
  • Paper scraps
  • Optional:  Gel pens, rhinestones, border punches, tear drop punch for earrings

Here is a photo of them:

Queenbeestudiogirlfriends

I had a lot of fun doing them because you can be as creative as you want. 

OK, let’s get started:

FYI:  I usually do not glue anything until I am absolutely sure I do not want to change anything

  1. Out of the flesh colored card stock punch a body (large scallop punch) and a head (1 and 7/8 to 2 inch circle punch)
  2. If you would like her to wear a dress, use the scallop punch and scrap paper of your choice – the off the shoulder look is created by cutting the top portion of the dress off…bikinis by cutting off most of the dress – you get the idea
  3. Punch 2 -  1 inch circles or 2 - 1 inch flowers for the boobies
  4. For black glasses, cut a 1 inch circle from black card stock and cut the circle in half
  5. If you desire your sun glasses to have frames, use the 1 inch circle punch for the outside rim color and punch a 1/2 circle out of black card stock and cut it in half
  6. Punch a circle or a heart for the mouth
  7. Use various punches for the hair

I will use my friend Jean to demo a few variations…

Girlfriend 1

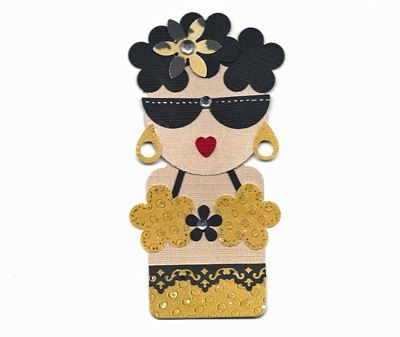
For Jean I used a silver gel pen and dotted a line across the top of her glasses.  I cut thin strips to make her halter style top.  I used a tear drop shape for her earrings and then used a circle punch to cut the holes to make them look like hoops.  The top of her bikini was made using a border punch.  Various rhinestones were added for decoration.  They fit perfectly on the front of blank cards, to use as bookmarks, or just hang around your creative space and make you smile.  Your imagination will know no limits and you will get to use some of those scraps you have hanging around. (Smile)

That’s it!  You have a new girlfriend!

Wednesday, June 23, 2010

It's a Blog Hop!

The Paper Craftorium is sponsoring a paper craft blog hop on Tuesdays...sound like fun!


Friday, June 18, 2010

Inside Queen Bee Studio!

Welcome to the “Where Bloggers Create” Party!

Come on in. Have a seat...

queenbeestudiochair

After taking up every spare closet in my house and never having any room to work, I finally found some space to make my own. I spend a lot of time here. I have always called my creative side my "therapy" and it truly is! My studio definitely works for me. I have most of what I usually need at my finger tips. I love to organize and occasionally find myself reorganizing to meet my needs. I always consider it to be a work in progress as it is always evolving.

QueenBeeStudio1 copy

All of the furniture in the room has been recycled either from other rooms inside my house or are gently used items. It’s amazing what can be done with a can of spray paint! Here is another view…It’s usually the view I get when I sit at my table unless I am at my jewelry desk where I love to bead.

Queenbeestudio2

The large armoire above holds my TV and lots of stuff. It’s where I keep my guillotine cutter, various size cutting mats, empty photo frames which I use for gifts and my quilting supplies.

queenbeestudio4

Oh, I see you straining to look at my ribbon holder…no need…here’s a close up…

Queenbeestudio3

I love it! It doesn’t hold all my paints, flowers or ribbons, but certainly the ones I use the most frequently.

Below is my jewelry desk. The lid opens and inside are all my beads and findings. It provides just the right amount of space.

queenbeestudiojewelrydesk I love being creative. I enjoy scrapbooking, both paper and digital, knitting, crocheting, sewing, quilting, counted cross stitch, embroidery, needlepoint and more. I love being in my studio and unwinding after a stressful day. I am never alone…my girlfriends are always with me. Here they are…

Queenbeestudiogirlfriends

Well, thanks for stopping by! I enjoyed sharing my creative space with you and hope you visit again.

Monday, June 7, 2010

Project: Old Printer Box Scrapbook…

Here is a very fun project…Take an old printer box, they can usually be bought at an antique store on various auction sites such as eBay.  Take various papers, old pictures, jewelry, ephemera, trims etc. and fill the squares.  You can fill one square or several with one photo.  A visitor to Queen Bee Studio did the one shown below.  As you can see, there are photos that sit on top of the drawers and some are recessed.  I recommend having a good idea of where you are going to place your items before gluing them down.  Enjoy!
Printer-Box
Here are a few close ups:
Printer-Boxclose-up


Printer-Boxcloseup2

Tuesday, June 1, 2010

Where Bloggers Create...

I ran across a great opportunity for everyone to show their studios where they create...It really sounds like fun and there is a chance to win some great prizes. Click on the link in my sidebar or the invite below.